Category Archives: Home

Home sweet home!

Little Changes, Big Differences: Scarf Organization

This post is the beginning of a series of posts called “Little Changes, Big Differences” where I’ll show how tweaking small things in your home can make a big difference.

My first project for this series is tackling my scarf storage. Owning a boutique where we’re known for our scarf selection means one thing: I have a ton of scarves. One of the main questions we get in the store (after how to tie scarves), is how to store them. Here’s how I’m currently storing mine, beginning with a before picture.

Bad scarf storage
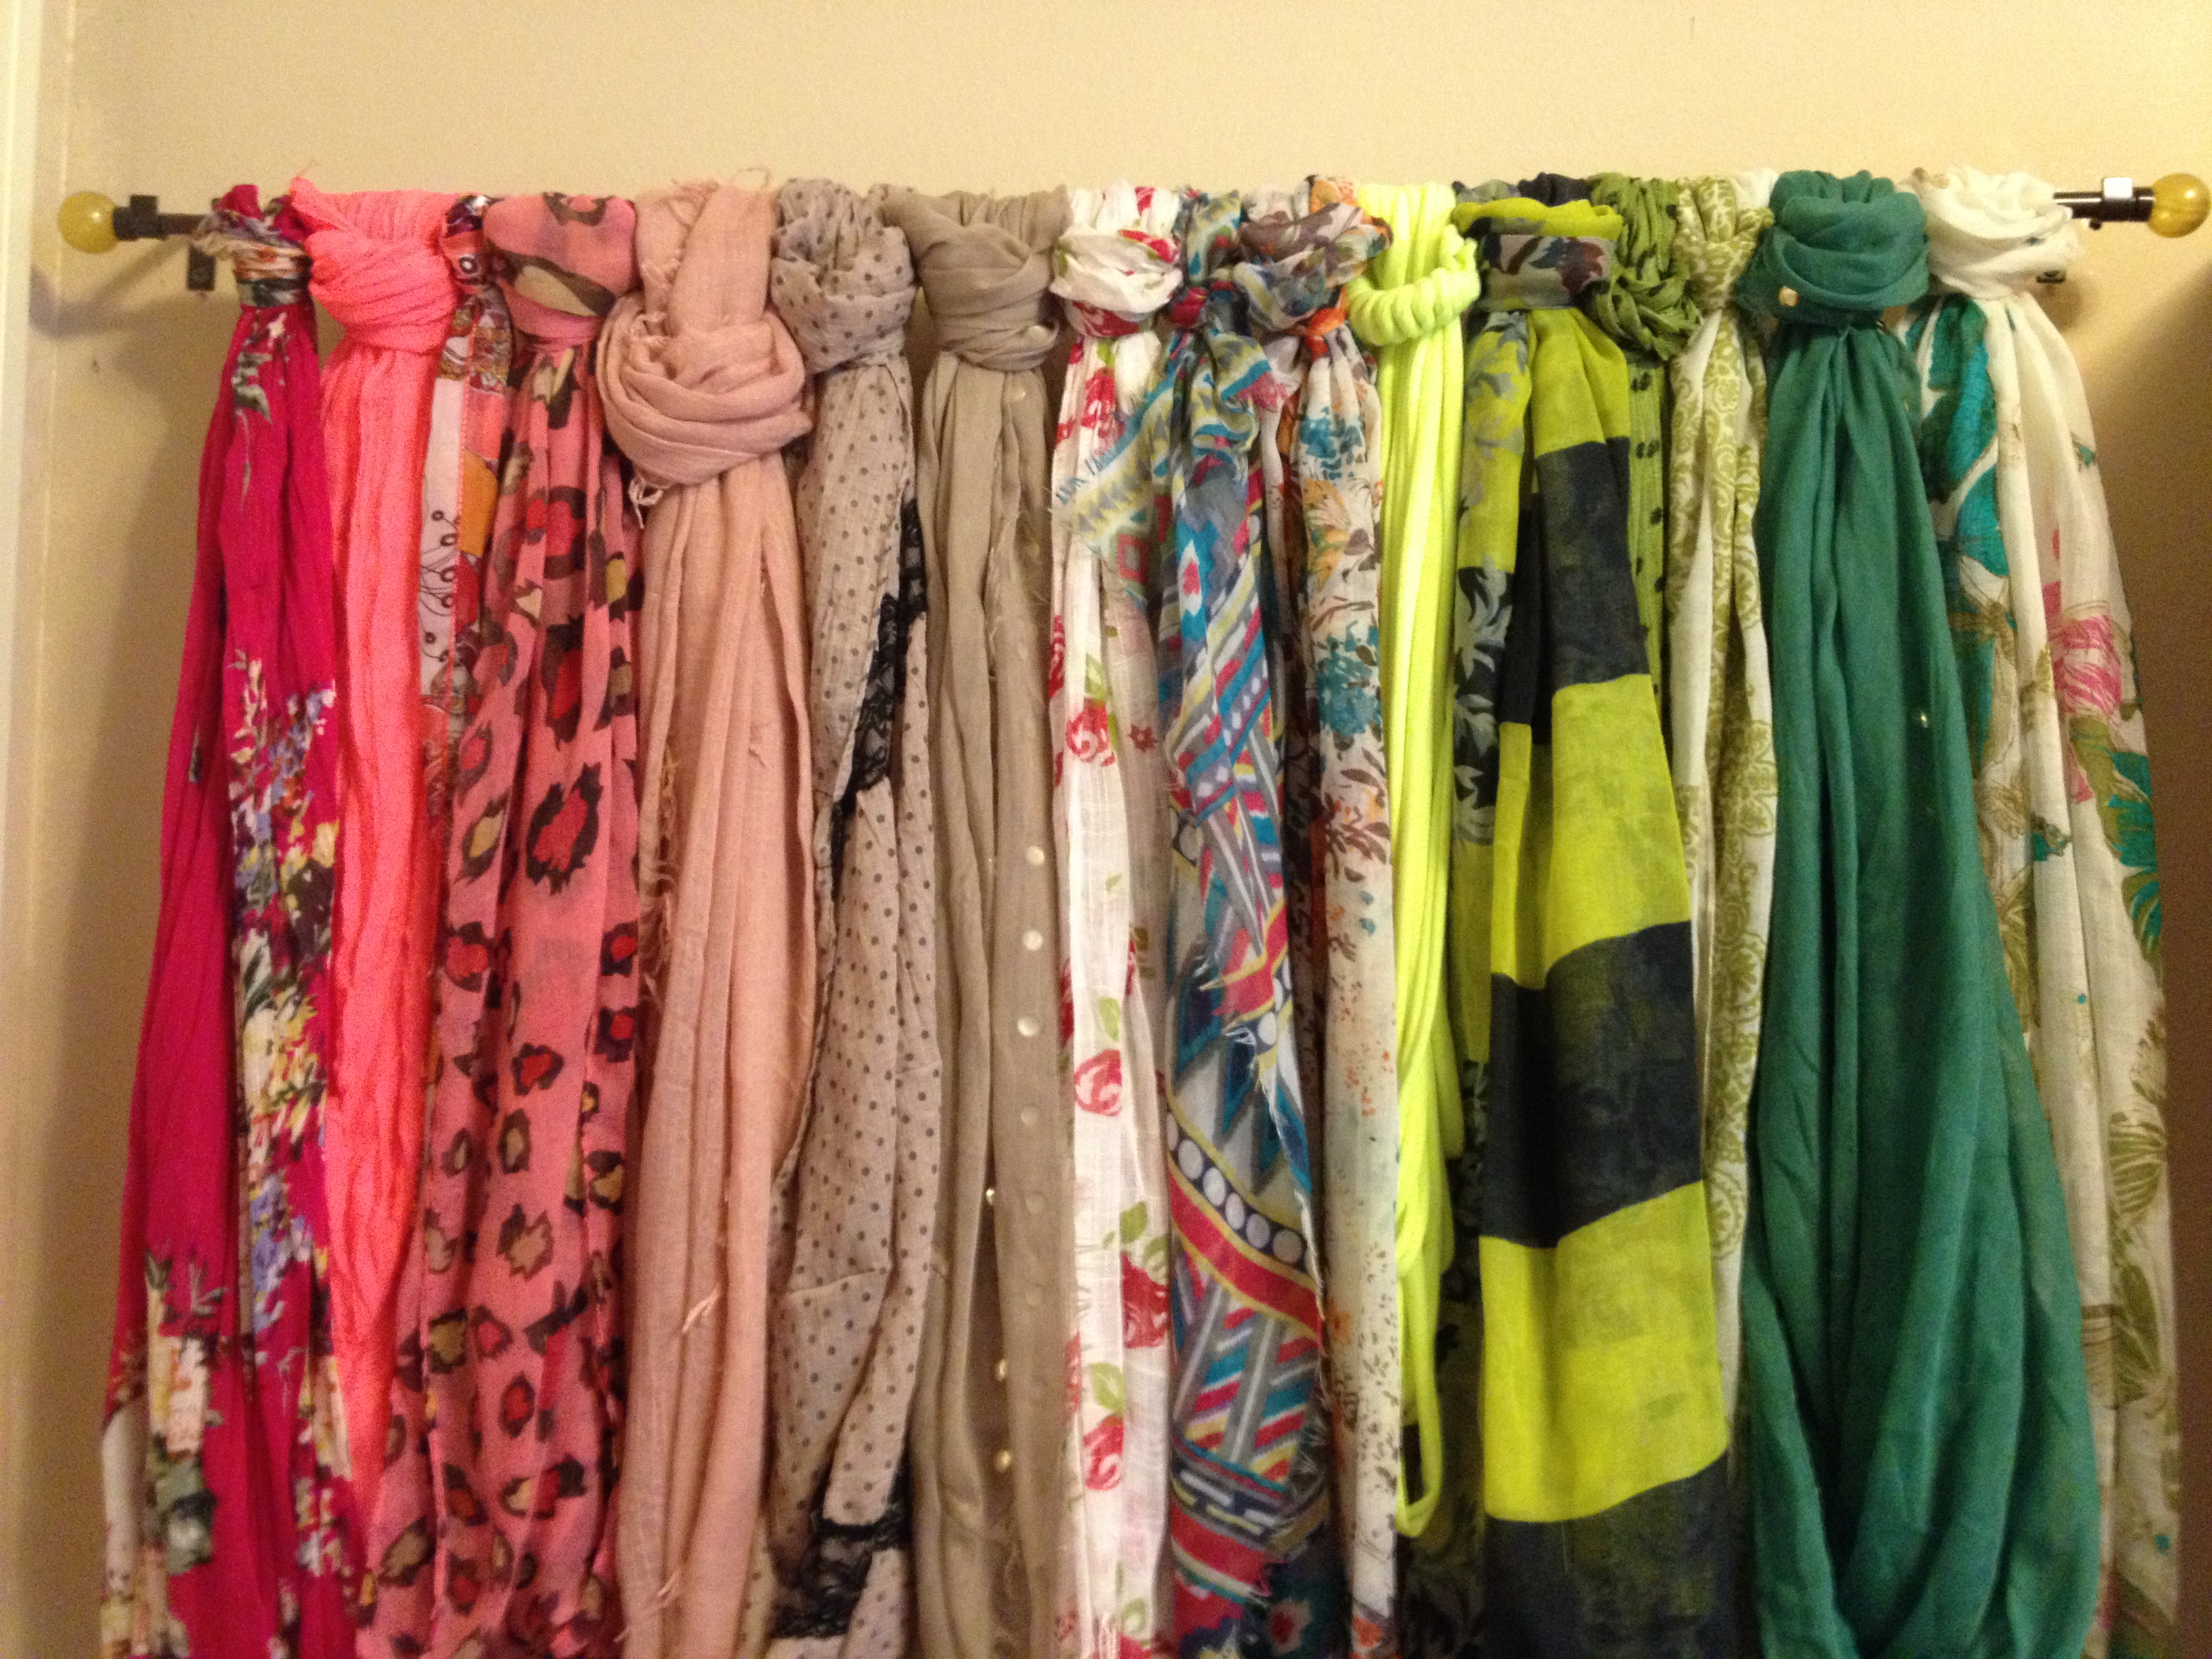
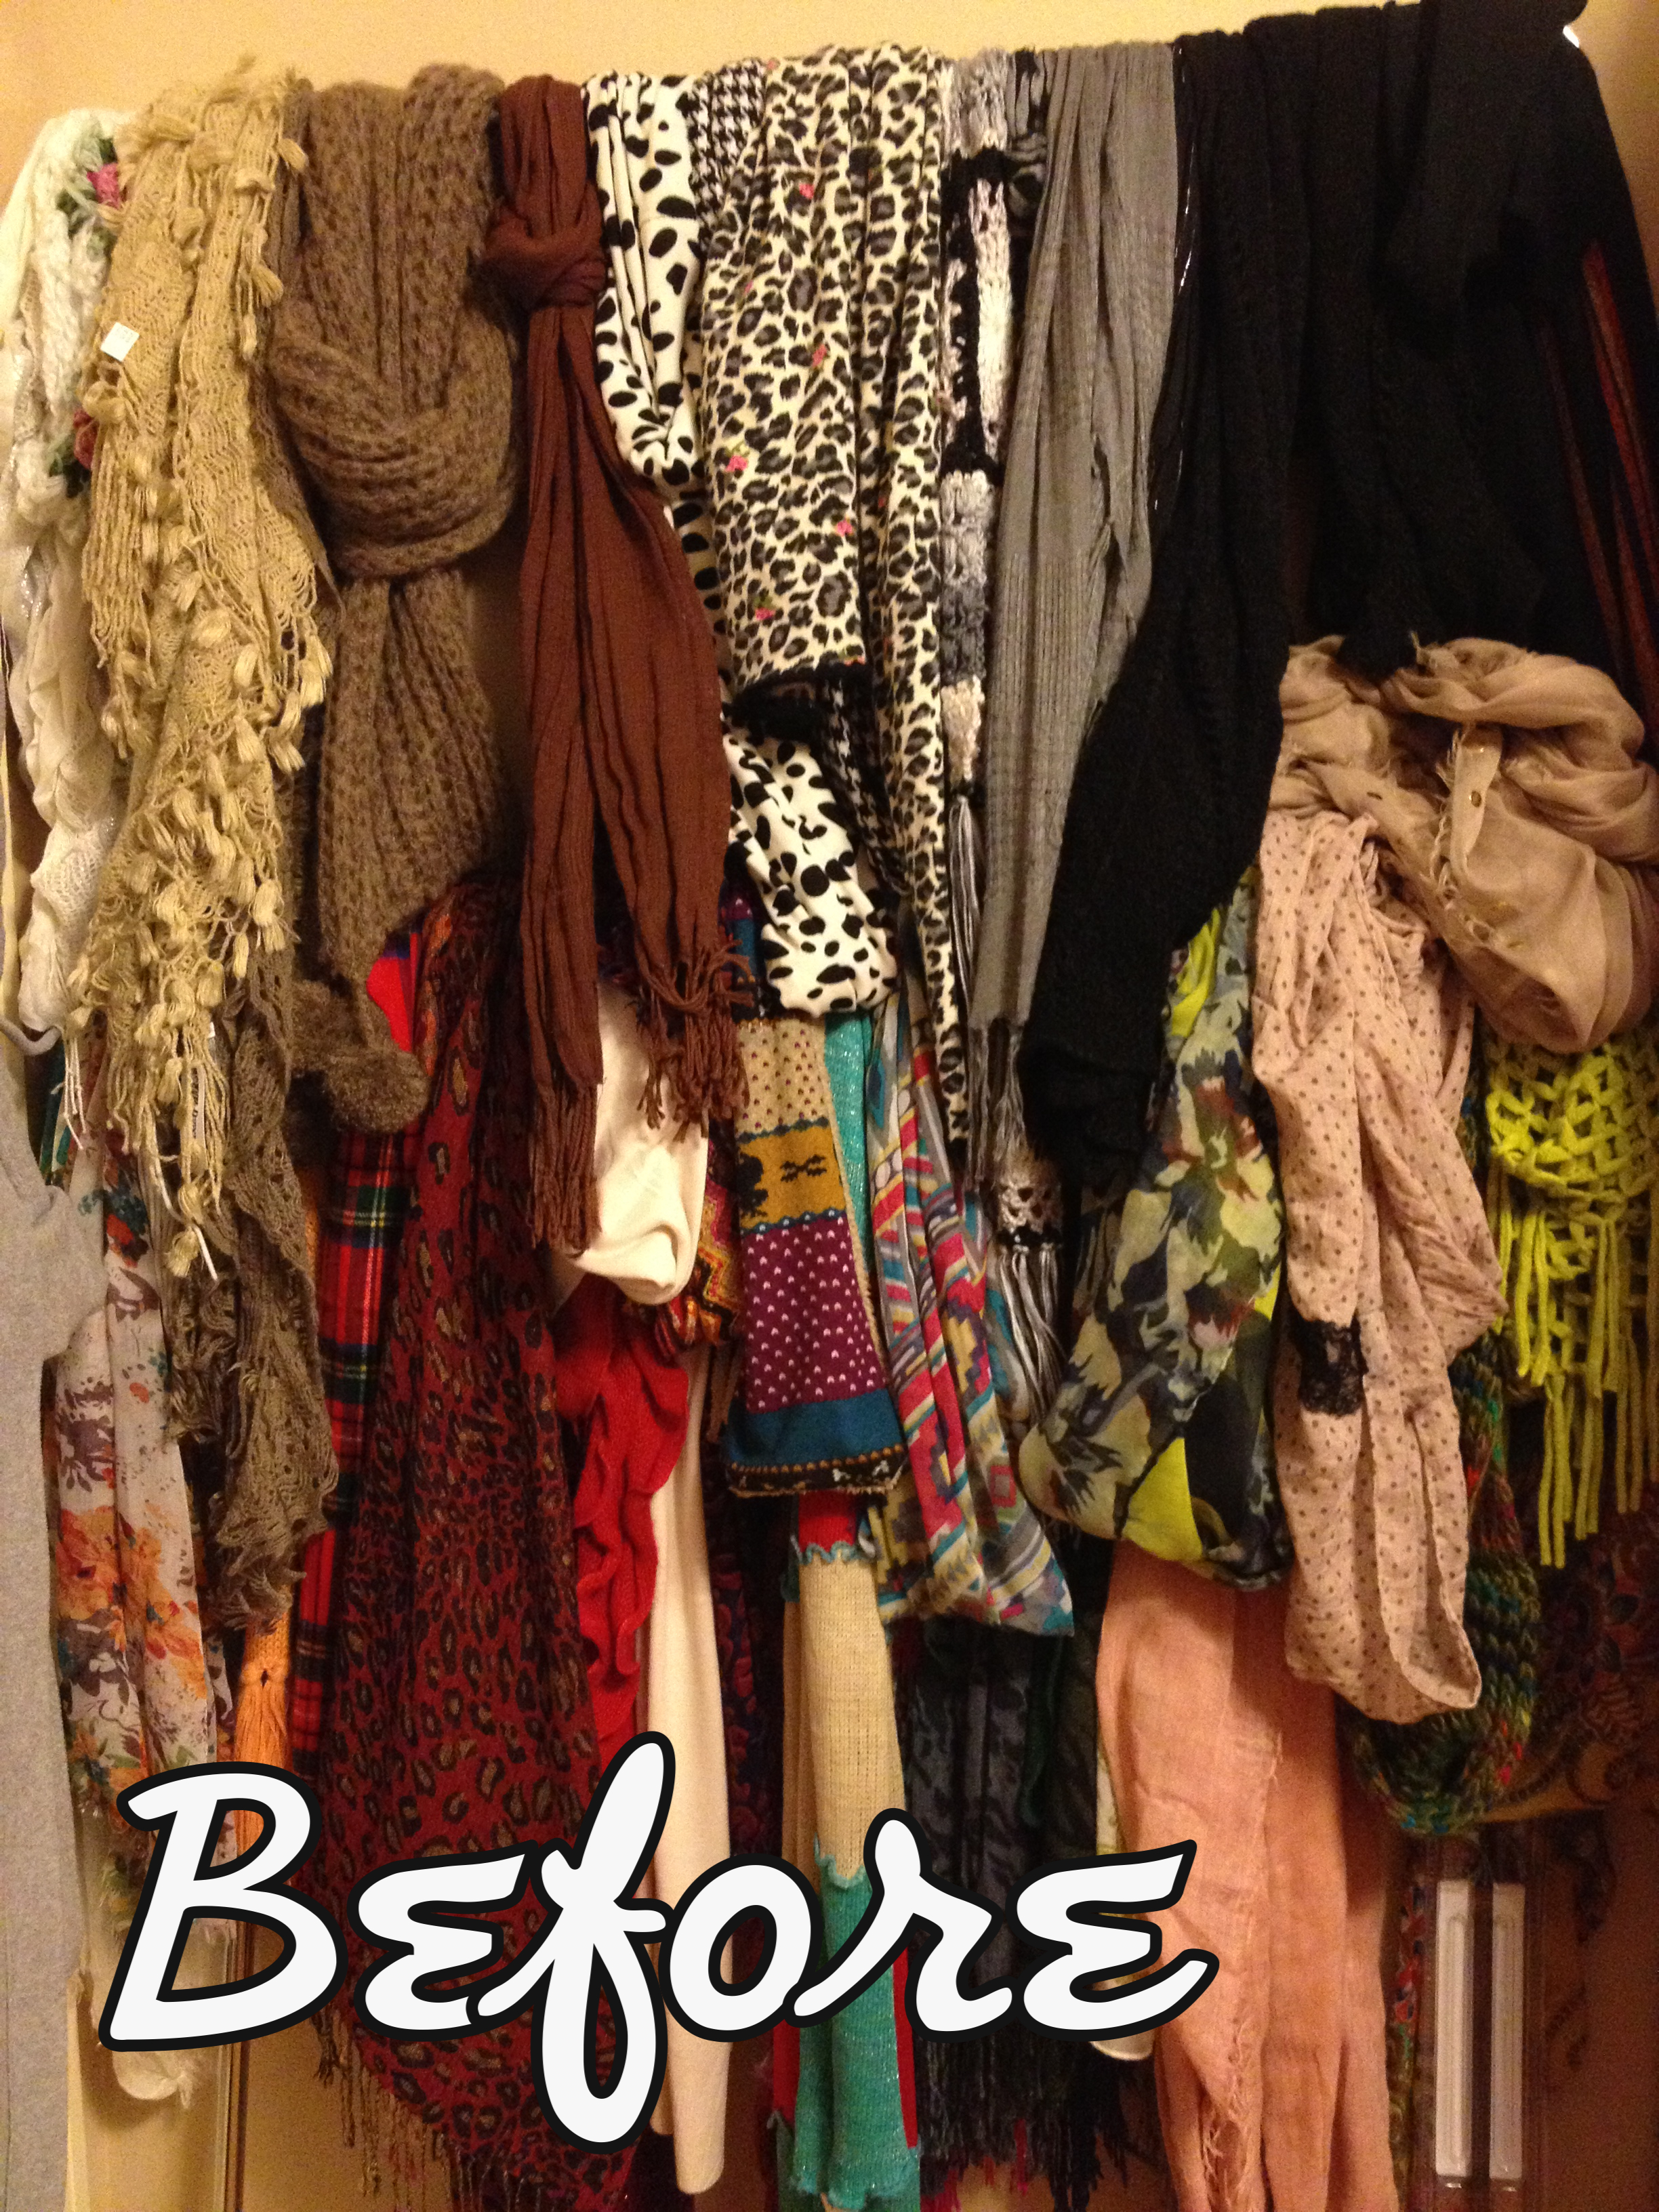
I mentioned before that I turned a spare bedroom into a giant closet. This project is still a work in progress, so it’s not exactly the fashion oasis that I’m hoping for, but we’re getting there. As you can see, my scarves are hanging on rods on the wall. I like to hang them so everything can easily be seen. I love seeing how pretty they all are, and I like the color it adds to the room. Even if you don’t have a closet room like I do, you can still hang scarves with a rod on the back of a closet door or back or side wall of your closet.

To hang these scarves, I used silver bars from Ikea. As you can see from the picture, the system wasn’t working. The problem was that the bar wasn’t far enough off of the wall for me to be able to easily hang the scarves. The thicker scarves barely fit through there, and when I was in a hurry (always), I wouldn’t have time to fight with them. In turn, the scarf wall ended up look like this crazy mess. Not good.

If a system or storage function isn’t working in your home, CHANGE IT. Spend a few minutes thinking about what the problem is and usually a small amount of effort and/or money can remedy your problem and makes things work more smoothly for you.

Since I determined that the bars were too close to the wall, I decided to replace them with actual curtain rods. We’ve used curtain rods on a wall at Salt & Pepper before, and it worked wonderfully. I already had these rods so this update didn’t cost me anything, but you can get similar ones at Ross for under $5. These were $3.99! After installing the new curtain rods, I have more room to slide the scarves in, making it much more feasible for me to keep it tidy.

(Shopping tip: I actually get most of my curtain rods from Ross, because they have really nice ones for amazingly cheap prices. Obviously, the ones that I’m using for this wall aren’t the “really nice ones,” but I needed smaller ones with a yellow tint for a different project, and they’re coming in handy for this project too.)

New scarf storagenew scarf storageAgain, making a small change, such as this one, can sometimes make a big difference in the overall function of a space. If you’re looking to make your home less cluttered and more functional, be on the lookout for areas like this where you can make a small adjustment and in turn create a better environment.

Do you have any areas that aren’t working for you in your home? Tell me about them…I might can help!

See more from my closet room here!


A Quick & Easy Spring Wreath

It was past time for a new, spring wreath, so I finally reserved some time to throw something together. I snagged this green, berry wreath at Hobby Lobby after Christmas for less than $10. (It was $60 regular price.) Even though it was a holiday wreath, I immediately thought of spring when I saw it.

Green berry wreath

floral fabricI decided to tie on some springy, floral fabric to spruce it up a bit. To do so, I cut a small 1″ slit and then pulled both ends of the fabric to tear long strips. I could have cut the strips, but I wanted it to look tattered and irregular. Then, I just cut 4-5″ pieces from the long strips to tie to my wreath.

tearing fabric into stripsstrips of fabricfabric for wreath I also added a burlap bow and ribbon. I used a zip tie to attach the bow, because I like to be able to take bits and pieces off and reuse them for other projects. (This bow came from my January/February wreath.) To add the ribbon through the wreath, I tied one end of the ribbon to the back side and hid the knot behind the bow. After weaving it through the wreath, I tied the other end on the other side of bow and tucked it away. After securing the bow and ribbon, I tied the strips of fabric on in alternating colors to fill the empty spaces around the ribbon. Finally, I tied a piece of spare fabric for a hanger.

zip tie for bowtying ribbon to wreathfloral fabric on wreathhidden wreath hanger

New Spring Wreath!And there you have it! After hanging it on the door, I think it might look a little too much like an Easter wreath. I’ll give it a week or so of hanging there while I decide if I it needs to be reworked or not. What do you think??

Homemade Laundry Detergent: Take 2

Detergent Supplies

I’ve made a few batches of this laundry soap and decided I just wasn’t crazy about it. I liked that there wasn’t any grating or cooking involved, but I just felt like it wasn’t cleaning quite enough, and it didn’t have a prominent enough smell.

I have a few version of detergent recipes pinned (Don’t we all?), so I thought I’d give another one a shot. I sort of combined this recipe with this one to create my own version. I liked the first one because it included essential oils, which I figured would make it smell good, but I didn’t want to make such a huge batch without trying it first. So, I used the second recipe and combined the Fels-naptha soap and essential oil from the first. Lets hope that was a good idea!

Here’s what I used:
3/4 bar Fels-naptha soap
1 cup Arm & Hammer washing soda
1 cup Borax
Lemon Essential oil
2 gallons water

Detergent SuppliesHere’s what I did:
Obviously, you start by gathering supplies. Sometimes people have a little trouble finding the borax. TP Outdoors carries it (and the Fels-naptha) if you’re in the area. The essential oils were equally tough to find. I finally found mine at Fiesta Nutrition. Some article suggest to not use supplies from your kitchen, so I dug a pot and grated spoon from the garage sale pile.

Grated SoapYou begin by grating your soap. I bought the Betty Crocker grater from the Dollar Tree, specifically to make this soap, but it grated the soap too finely so it was taking FOREVER! I ended up pulling my hand grater from the kitchen and using it instead. One of the recipes suggested using just half of the bar of soap, so the detergent wouldn’t be too thick. I wasn’t sure, so I went the middle of the road and used 3/4 of the bar. However, the detergent ended up being too thick for me, so I’d suggest only using 1/2 of the Fels-naptha.

Cooking soapAfter grating the soap, you add it to the pot with one gallon of water. I also read somewhere that you have better results from using distilled water, so I purchased two gallons from TP Outdoors, as well. (Turns out that distilled water makes it thicker…that may be another reason mine was too thick.)

Heat the soap and water until the soap melts. I cooked mine over medium heat. Warning: this process took much longer than I expected…approximately 10-15 minutes.

Once the soap is melted, you add in 1 cup of washing soda and 1 cup of borax. I also added 4-5 drops of lemon essential oil. (I chose lemon because I like the smell, and because they say lemon kills bacteria, etc.) Mix these ingredients together and bring to a boil. This process took much longer than I expected too. However, when it started boiling, it almost immediately started to boil over, so I’d keep a close eye on it.

Boiling laundry detergentOnce the mixture starts to boil, remove from heat and add the other gallon of cold water. (I put the second gallon in the fridge to chill earlier that morning.)

Ideally, your pot should be able to hold the 2 gallons of water so you can stir them together comfortably. Mine only held approximately 1 1/2 gallons, so I split the remaining water between the gallon jugs, stirred the mixture in my pot, poured it into the jugs, and shook vigorously to mix in the remaining water.

pamelapetrus (4)I saved the gallon jugs, so I used a funnel to pour the mixture back in to the jugs. You’ll want to do this over the sink. I made a huge mess and wasted a good bit! Had my pot not been so full, it would have been easier to pour.

Homemade laundry detergentSo there you have it! The process was less intensive than what I imagined, with grating the soap being the hardest part. You use 1/2 cup per load of this recipe. I am doing laundry today, so I’ll hopefully have an update soon on how well this recipe works. I really like the idea of making my own detergent, so I hope to find a recipe that I like.

If anyone has a recipe that they love, please share. Furthermore, if you try this recipe and love it or hate it, please let me know how it goes!

Spring Cleaning.

I was reading this post about spring cleaning, and the writer challenged her readers to blog about their spring cleaning goals. At first I was reluctant because just the thought of all of the things I need to do made me instantly stressed. But, I decided to bite the bullet and thought that an actual list (and blogging it) might give me a starting point and some accountability. So here we go!

One of the most important things about setting goals is to make them achievable. So, I made an effort to really think about specific things that I felt like I could knock out this month. Here’s to hoping that this list will help me make them happen!

My Personal/Home Goals for April:
1. Build a curtain rod and hang new blinds & curtains in my closet room.  (Yes, I have an entire room for my closet. I talk a little about it here. More to come soon!)

Ugly windows in closetOur house had these hideous, yellowed  blinds from 1940, and we’ve changed all of them except this room. I’ve had the curtains and blinds for a while now and just haven’t gotten around to changing them out. It’s time to make that happen.

2. Clean out the third bedroom.

Messy third bedroom
This is just one corner of the room. I’m embarrassed to show how messy it is!

I had to take a deep breathe before even writing this one down. The third bedroom –AKA The Dungeon — is a terrible place. I hate it’s darkness and outdatedness. (I seriously doubt that’s a word.) It has paneling walls and the most hideous carpet in the world. On top of that, it’s filled to the max with stuff. It has boxes that haven’t been unpacked from when I moved in, boxes of Matt’s things from when we got married, excess furniture, holiday decor, and loads and loads of other JUNK. You would be amazed at the amount of stuff crammed into this one space. I’m talking a couch, bookshelves, entertainment centers, two beds/mattresses, and boxes galore…that’s just to name a few. All of that being said, cleaning that room out has been on my to-do list for months. I need to make it happen now because we want to….

3. Have a garage sale.
Garage Sale ItemsOnce I get #2 taken care of, the next big goal is to have a garage sale. We could likely furnish an entire second home with the excess stuff we have. If you’re in our area and need some stuff, come by our garage sale. There’s no telling what you’ll find.

And now for a more fun goal:
4. Switch closet over to spring.

Yellow wedges
Love these shoes! (Available at Salt & Pepper, of course!)

This is one of my favorite tasks of the year! I love getting out all of my clothes & shoes that I’ve forgotten about. Even though I love it, I always tend to put it off because it’s a hefty task. Nonetheless, spring is here and I know there’s a ton a cute sandals waiting to show off my newly pedicured toes. I’m going to knock this one out soon.

And lastly…
5. Do at least a little work on the bedroom decor.
MasterbedroomOur bedroom has taken on a few different looks since we’ve been married…a little over 8 months now. (We’re on our 3rd comforter if that tells you anything.) On my birthday, my sweet husband surprised me with this lovely Anthropologie duvet that I’d been drooling over. He also hung that shelf and threw those decor items up there. And it hasn’t changed…I haven’t done one single thing in there. It looks exactly the same as this picture from January (except for a few pair of earrings that have collected on the shelf.) I’ve been very excited about decorating our bedroom, but it keeps getting replaced with “more important” things. This month I hope to at least make a tiny bit of progress in there.

I almost got carried away while making this list. It’s so easy for me to let my mind run wild when thinking of all the things that I need to do. However, I knew that I needed to keep myself in check. I need to finish my real estate class in the next 2 weeks. I will also need to study for/take the final test and the licensing exams. This is in addition to regular home upkeep/cleaning and my lofty Salt & Pepper to-do list. Time is a valuable commodity around the Petrus household.

All things considered, I think I’ve set some pretty obtainable goals for this month. Most of all, I’m hoping that actually making this list and sharing it with the world, will give me the dedication I need to make these things happen. (Thanks Elsie for the push!)

Maybe you should join me! What would you like to accomplish over the next month? If you have a blog, write about it and then share a link in the comments. If not, just share your goals here in the comments section. I’d love to hear about them! And maybe, just maybe, we’ll all get a little more done by creating accountability for each other.

Here’s to a productive April!

Living Room Sneak Peek

I plan to do tours of our home soon, but I’m still working on getting things squared away the way I like it. For now, here’s a peek into our living room.

Living Room_Gallery Wall

(Photo frames: Hobby Lobby, TJ Max, and Ross. Star burst mirror: Paul Michael Company. Turquoise “P”: Hobby Lobby. Old mirror: vintage, gift. Empty oval frame: vintage from Salt & Pepper.)

This gallery wall is possibly one of my favorite parts of our home. I love random collections of things! For this one, I really like the mix of old and new.

This was my first gallery wall to do, and I must say it’s a lot tougher than it seems. Mr. Petrus and I spent well over an hour sorting through things and deciding what looked best where. (In reality, Matt gave up after about 15 minutes and came back when I said I figured in out. Haha.) Once I picked a layout, we laid down some sheets of large white paper, kind of like butcher paper on a huge roll. We traced out where the items went, and then taped the paper to the wall. We also made marks on the paper where the hangers were, so it was much easier to know where to put the nails. (I saw that trick on Pinterest.) I definitely suggest laying everything out on the floor and playing with it a bit before deciding where each piece will go. Plus, you’ll want to do something to mark where they’ll go on the wall to keep from ending up with unnecessary holes.

We installed this gallery wall before our Halloween party in October. (Of course…when else would a Halloween party be??) After several months, I’m still in love with it, so that’s a good sign!

What do you think? Do you like gallery walls?

Cleaning Out Your Closet

The night we came home from Memphis, I unpacked my suitcase and went into beast mode in my closet. My darling husband convinced me to turn an extra bedroom into a closet (Why wouldn’t I marry him after that?!), but I’ve spent months trying to get it set up properly and more efficiently. Something on the ride home made me determined to make it happen.

This room is a work in progress, so I’ll be sharing more about it as I go along. This post is about cleaning out your closet. (That could also be about cleaning negative things out of your life, but I meant it in the literal sense.) You must clean out clutter before you can get an area organized.

Honestly, it’s quite sad that I had an entire room for a closet, and I still didn’t have room for everything. Every area was spilling over, and it felt like I could never get everything squared away. I decided that I needed to get rid of more stuff. This is the 3rd time I’ve “cleaned out my closet” in the last 4 months. Even though I’ve already gotten rid of a ton of stuff (3 storage tubs and a big box full + a few garbage bags), I still felt overwhelmed by the amount of clothes crammed into one room. Somehow I still managed to purge 2 full garbage bags of stuff.

Garage Sale PileThere are tons of suggestions on the Internet for how to clean out a closet and I’ve tried a few of them. After all, this is a very daunting task for me…I hate getting rid of anything! So here’s how I finally did it.
1. One of the most important things to think about while cleaning out a closet, is to get rid of anything that no longer fits well, isn’t flattering, or is damaged. Don’t keep a shirt with a hole in it even though the tear could be covered with a jacket. If it’s stained, throw it out. Period. Even more importantly, don’t keep anything that you don’t feel great in. One of the most common bits of fashion advise that I give is to only wear things that you feel great in. If those jeans are just a little too tight and give you even the slightest muffin top, get rid of them! If that shirt fits just a little too tight across the midsection and makes you uncomfortable, don’t keep it! It’s much better for you to wear the same flattering pieces over and over again (in different ways of course), than to wear things that don’t make you look your best. Being brutally honest with yourself in this area will help you to get rid of things that you shouldn’t be holding on to. It doesn’t matter what brand it is, how pretty it is, or how much you paid for it. If it doesn’t make you feel like a million bucks…get rid of it!!

A purging hindrance can often be weight fluctuation. You don’t want to get rid of things because you might lose/gain weight and be able to or need to wear it again. This is another area where you have to be brutally honest. And let’s face it, thinking about your weight can be brutal. It’s a good idea to keep a few pieces in a size up/down from what you’re currently wearing, especially if you fluctuate regularly. However, do not make a habit of keeping things that haven’t fit in years.

2. The second strategy that helped me was to pick a storage area for certain pieces and get rid of any that wouldn’t fit there. For example, there is no reason that my yoga/lounge pants shouldn’t fit in one drawer. So, I picked the best place for them to go and narrowed down the collection until they all fit. (Remember, you don’t want any drawers, etc. to be too full or you’ll be less likely to keep things in order. Nothing is worse than trying to cram things into an overly full drawer.) When I realized how many would fit, I got rid of a few of my least favorite pair to make it work. Realistically, why do I need more than two pair of black yoga pants? I always gravitate to the same two pair anyway.

Folded Storage
Storage tip: fold items and store them this way rather than on top of each other so that you can always see your options. I’m also a fan of color coordinating…it just looks more attractive!

I’m going to share more about closet organization soon, but you must start by getting rid of extras that you don’t need. Don’t forget rule #1. If you wouldn’t wear it on a day when you wanted to look top notch, then don’t keep it in your closet.

Anybody have any tips that’s worked for them? This is a constant battle for me, so I’m always open to suggestions!

Who loves mopping??

I just finished mopping and I loved it!! (No, Mom, you’re not dreaming…)

Anybody who knows me knows that I HATE to mop. It’s by far my most absolute dreaded household task. I have been known to put it off (sometimes indefinitely) & try anything to find an “easy” way. This morning I tried a new mop and a new method, and I’m sold! Mopping (3)

When my mother-in-law told me that she uses a spray bottle with a vinegar/water solution to mop, I couldn’t believe I hadn’t thought about that! A spray bottle?? That’s GENIUS!! (I’m sure some of you have already thought of this, but I’m still learning & this post is for the rest of you who haven’t had this revelation yet.)

I’ve started trying a vinegar/water solution to clean other areas of my home, so I already had a spray bottle ready. My MIL says she uses about a 4-1 solution, but mine was probably a little more vinegar-heavy.  No matter what solution you use, put it in a spray bottle. I’ve never had an easier time mopping…just spray a small area, mop, and move on! (If your bottle has a long stream like mine, be careful where you spray. I may have coated a wall or two and the end of the couch…oops!)

Now let’s talk about the mop. On my last make-mopping-easy attempt, a friend told me about a microfiber flip mop from Wal-Mart. Today was my first time to use it, but she’s on to something.

This is the O-Cedar Microfiber Flip Mop, and I LOVE it! I preface this by saying that I’ve tried practically every type of mop known to man in an attempt to find something I didn’t hate. Why do I love this one? I’ll break it down for you.

It doesn’t have to be rung, twisted, hung to dry…none of that. It also doesn’t leave pieces or string or sponge everywhere. Instead, once you use it, you just remove the microfiber cover and toss it in the washer. With the spray bottle, you just spray and mop. (No dipping or squirting a Wet Jet that soaks the pad and eventually tears it.) The microfiber stays wet enough to clean but dry enough to not make an even bigger mess than you started with.

When one side gets dirty, you just flip it over and use the other! I bought an extra cover so that if I wanted to mop and hadn’t washed the other one, I’d have a backup. (Like that’ll ever happen!)

The handle swivels, so you can spin it around to fit in small spaces. The only problem I had with the mop is that the handle will come unscrewed from the mop head. Once I realized this though, I just swiveled it the opposite direction and was careful to tighten it back up every now and then.Mopping (2)

My favorite thing about this mop is how thin it is. This means it will slide under practically anything…including my dining table where nothing will fit under! You can easily slide it under cabinets, under the couch, and even under a closed door!Mopping (1)

When I say that I love this mop…I’m not exaggerating. I should probably contact O-Cedar and get a commission for this awesome review! Seriously though, this mop and spray bottle technique may have changed my hatred for mopping. We’ll have to see if I’m as excited about it next time, but maybe…just maybe, I won’t dread this chore anymore!

Bathroom Makeover

I’m finally getting around to posting pics of our bathroom makeover. With the busy holiday season approaching at Salt & Pepper, I’m sure my posts are going to be few and far between for a bit.

Before: Yuck!

Nonetheless, here it is…our amazing bathroom transformation! They say that bathrooms and kitchens sell houses. Well, that just wasn’t the case in our rent house. (I won’t even talk about the dreadful  kitchen today.) And as you can see, the bathroom is the size of a small closet. The awesome master bedroom, gorgeous hardwood floors, and PERFECT location are what sold us on this house…definitely NOT the bathroom or kitchen.

I will never understand what made someone chose this dreadful green color for the bathroom. It was the color of toothpaste! To make matters worse,

Love this shower curtain!

someone patched the walls (poorly) with the wrong color paint, which really made it look like a child smeared old toothpaste all over the place. In this case, a can of paint really made a huge difference.

Since the room is so small, I decided to paint it stark white. I also thought it would be a good contrast to this FABULOUS shower curtain.

We switched out all of the towel racks to our awesome, new branch-looking ones. (Thanks, Mom, for all of the new bathroom goodies. She hooked us up with a new bathroom as part of our wedding present.) We changed the knobs on the doors. Two doors had old, dreadful silver knobs, and the other two had porcelain white ones with monkeys on them…no joke. (Notice the new knobs match the shower curtain rings that I already had. Total accident, but I loved it!)

Possibly my favorite part of the new bathroom is this cool ladder shelf. I bought this ladder to use as a night stand, but it was too short. It makes a perfect holder for these baskets! Matt & I each have one for our toothbrushes, etc. (The baskets were also a wedding present.)

My favorite part!

Other bathroom details: My mom bought me the rug as a housewarming present when I moved here, and it covers up a large chunk of that ugly floor. The bird containers were also a wedding present from my mom. (I’ve since broken one of them, so now the center serves as a candle holder. I was so mad!) I already had the wall sconces, curtain hook, and rod from my very first town house. The curtain was originally my sisters. My mom used it for a bit at her house. Then, we used it as a table cloth at one of our wedding celebrations, and now it’s my bathroom curtain! Also, Matt hates the light fixtures, but I happen to love them! I think they compliment the decor nicely, and of course, I love anything vintage!

Well, there ya have it…our Sunday afternoon bathroom makeover. I’ll post the living room decor next, but in the meantime, let me know what you think of the bathroom! I love seeing everyone’s thoughts and comments!

After: Much Better!

Move Over Paula Dean!

Looks yummy…not!
Ok, so I’m not quite Paula Dean. More like Chef Boyardee…that you heat straight from the can! Either way, here’s my post about my first major freezing experience, for those of you who are keeping up.

All of the blogs I researched said not to do your cooking/preparing/freezing on the same day that you shop. I’m sort of short on time, so I broke that rule. Big mistake! I didn’t realize the experience had taken so much out of me until I was straight in the middle of putting away my chicken (the last thing on the list). Luckily, Matt was a team player and came to save me, because I was about to throw it all in the trash and walk away! It went much quicker with an extra set of hands.

If you read my shopping post, you remember that I stocked up on hamburger meat that was dated for that day, so I knew I had to cook it quickly. (I’m a stickler for expiration dates, so I was paranoid about acting fast.) We were planning on having tacos that night, so I made 2 lbs into taco meat. We ate some that night and had enough for 2 additional meals to freeze. This worked great because each time we have tacos, we end up throwing away a good bit of meat.  This way, we had enough for a third meal! We haven’t tried the frozen taco meat yet, but I’ll report back on how it turns out.

After the tacos, I had 8 lbs of ground beef left, so I took to browning! I browned approximately 3 lbs at a time, drained it, and dumped it in a large storage container. After all the meat was browned, I left it to cool on the counter for a bit. (You shouldn’t put hot foods straight in to the freezer or fridge.) Once it was cool, I sorted the meat into one pound increments. I panicked at first because once the meat was all mixed together, I didn’t know how much a pound was. I don’t have a fancy meat scale. No worries though…I have a handy husband. He said a pound of hamburger meat was about 2 cups. (How does he even know all these random things??!) So, I measured out somewhere between 2-2 1/2 cups and poured into freezer bags. Before adding the meat, I wrote on all the bags and included the date so I would know how long it would be in the freezer. I’m a stickler for dates, remember?

All bagged and ready to go!

The most important thing about freezing in freezer bags is to remove every last bit of air that you can. This is what keeps foods from getting freezer burn and ruining.

The next day, I worked on all the other meats. I marinated a few steaks and put in bags of 2. I did the same with pork chops using this recipe. We haven’t tried them yet, but they smelled promising! Finally, it was time to do the chicken…dreadful chicken. As I mentioned before, most of our menu this month was chicken. Here’s a tip: don’t save your biggest task to last. Seriously, if Matt wouldn’t have come to help, I would have thrown the last of that stupid chicken in the yard and went to bed.

I had an assortment of breasts and tenderloins. I washed them all and piled onto a cutting board. I used my kitchen shears to trim them up so there would be less to do before cooking. (If you don’t have kitchen shears…get some!) After trimming all of the yucky stuff off (technical language), I moved them to a second cutting board where I sorted them by what was needed for each recipe. Even though most of the chicken was frozen plain, I still wrote the recipes on each bag. This will keep us from using chicken that was planned for another meal. It will also be easy to just pull out a bag for whichever recipe we want to make…less thinking involved.

Since this was my first experience, I didn’t do quite as much in advance as I could have. I realized when making this Parmesan Chicken, that I could have boiled the chicken before freezing it. Oh well, I’ll pay closer attention next time.

So far, it’s going well. The only major hiccup is that I’m not in the habit of taking the next day’s meal out the night before. Luckily, we have a pretty awesome defrost setting on our new microwave, so we can thaw things that way. But, I plan on getting better at doing it the night before.

All in all, it’s been successful. I can’t really tell a difference in the frozen meats vs fresh…especially if they thaw naturally. The biggest source of convenience is not having to go to the grocery store each week. I feel so relieved! Plus, we’re coming in under our food budget for this month. That’s a nice bonus! I’ll keep everyone updated about new findings and experiences regarding my stocked freezer. I promise my next post won’t be quite so long! There are just too many details for this topic!

I want to thank everyone for caring enough to read (especially these long ones). I’ve had fun sharing my experiences, and it’s so encouraging to have those of you who are wanting to keep up.

 
I hope to share our bathroom face lift next…it’s a good one!
 
Note:
If you’re interested in where I got most of my info, check out this site. This is where I decided I should try something like this. I literally read through every link on the page. Great info!
As always, I’d love to hear your thoughts!


Filling the Fridge

I made my first shopping trip for a month long supply of groceries, and it was a huge success!

We were spending an average of $115-150/week on groceries. (That’s $500+ a month.) Last week, I spent $219 for the entire month, giving us 29 meals! This doesn’t include small meals like sandwiches, etc. I am so proud of myself! (My saving came just in time because we got a $350 bill from the dentist. Ugh!) What’s even more exciting is that my goal was to spend under $400, and I was praying to not go over $600. When the clerk said $219, I almost jumped up and down!

Here’s how I did it:
I’ll start by saying I didn’t go coupon crazy or anything like that. I applaud people who can get groceries for next to nothing, but I simply don’t have that time or patience. I did load a few coupons to my Brookshires Loyalty Card for things I was already buying, but they only saved me a few dollars. (You should definitely get the app for your phone if you’re a Brookshires shopper.)

Preparing for the shopping trip took waaaay longer than I imagined. I went through 10 different cookbooks, searched online, and created a list of meals we’d like to have this month. This took quite a bit of time. It’s surprisingly hard to think about what you’d like to eat for the next 30 days!

I typed up all the recipes in a new “Petrus Family Recipes” file. (I’m still in shock that Matt & I are “The Petrus Family”…weird!) This seemed a little redundant, but I decided it would be best to have all of the recipes in one location, rather than having to dig around for them. This way, we can add and take away, creating a file of our favorites.

Then, I went through each recipe and made a list of all the ingredients I needed. I shopped our pantry to see what I already had, and made a list using tally marks for the rest. I stole this idea from a blog I read, and it worked great. (I’ll do better at remembering where I saw things and giving people proper credit…I’m new to this blogging thing.) Basically, you just write down the things you need and put tally marks next to them as you come across more of that item in another recipe. Genius! I ended up rewriting my list to be sure it was nice and neat. I also put it in order of departments, which made it much easier when I was at the store.

Next, I looked at the Brookshires sale paper. (Probably should have done this first.) I love Brookshires because it’s always nice, clean, and fully stocked. I don’t have time to shop around, so we’ll be saving on whatever they’re putting on sale. (I just won’t drive across town to save .50 on flour.) This week was a great week for my first big trip…so much great stuff was on sale! I adjusted my menu a tad to include some sale items and headed out! All in all, I probably spent 8 hours preparing…maybe a little more. I expect it to go faster as I get more experience.

The big sales at Brookshires really played in to my huge savings. Chicken was buy one, get one for a penny. Most of my menu was new chicken dishes, so this worked perfectly! There were several other things I needed that were on this promotion too, so we lucked out!

I’m also so very proud of my ground beef purchase, so much so that I have to blog about it! I needed 10 pounds of ground beef, and the bulk packages weren’t really that good of a deal. As I’m picking out my chicken, the meat market lady puts out some big packages of hamburger meat that caught my eye. They had been marked to half price for quick sale because they went out of date that day. This was perfect because I was planning to brown and freeze all the hamburger meat when I got home anyway! I ended up paying $20 for ground beef that I was going to have to pay $40 for. As silly as it sounds, I couldn’t wait for Matt to get off work so I could tell him about my steal. Between this and the buy one, get one for a penny sales, we really saved some money this month!

All in all, I’m pretty proud of my shopping trip. Doing my homework and preparing ahead of time, really made a huge difference. So far, I’ve only noticed a few small things that I forgot. Not too bad for my first time! I’m really hoping that having a month worth of groceries in the house and a clear plan will save us some valuable time and money. Guess we will see!

For those interested, I’ll post about my cooking/freezing adventure very soon. There’s lot going on in the Petrus household!

Please let me know your thoughts. I’d love to hear them!