Little Girl’s Dresser Project

I spent last weekend helping my friend set up her little girl’s “big-girl room.” (We have a new baby on the way that’s going to need the nursery!) Priority #1 was finding a dresser. This post is written to show you to think outside the box…it could save you some cash!

The dresser we found was going to cost $300, but we checked the sale section and found a similar white dresser for just $125! It needed knobs/handles and a good wipe down, but other than that it worked perfectly! (There was also a small scuff on the back, but no one would see it anyway.) So of course, we bought this one and headed off to find hardware!

She just needs a little TLC!

I learned a valuable lesson about handles that day. The pre-drilled holes were only 1 ½ inch apart, which turns out to be a very difficult size to find! My friend started to get a little nervous about our purchase, but if there’s anything my Mama taught me, it is to “make it work.”

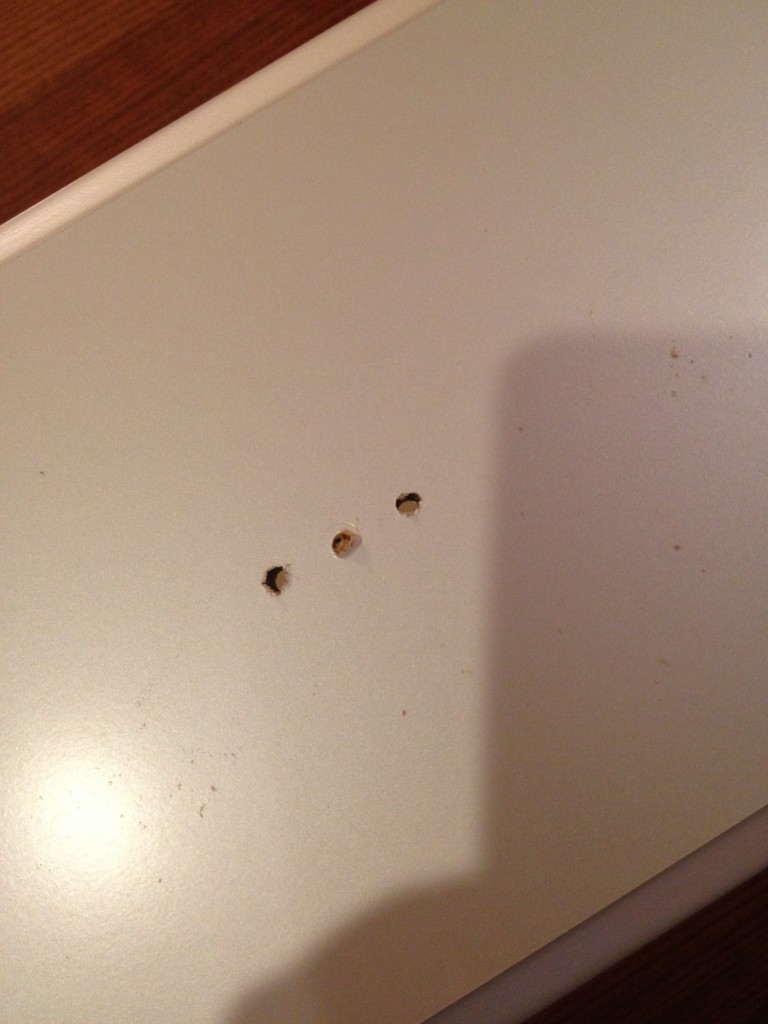
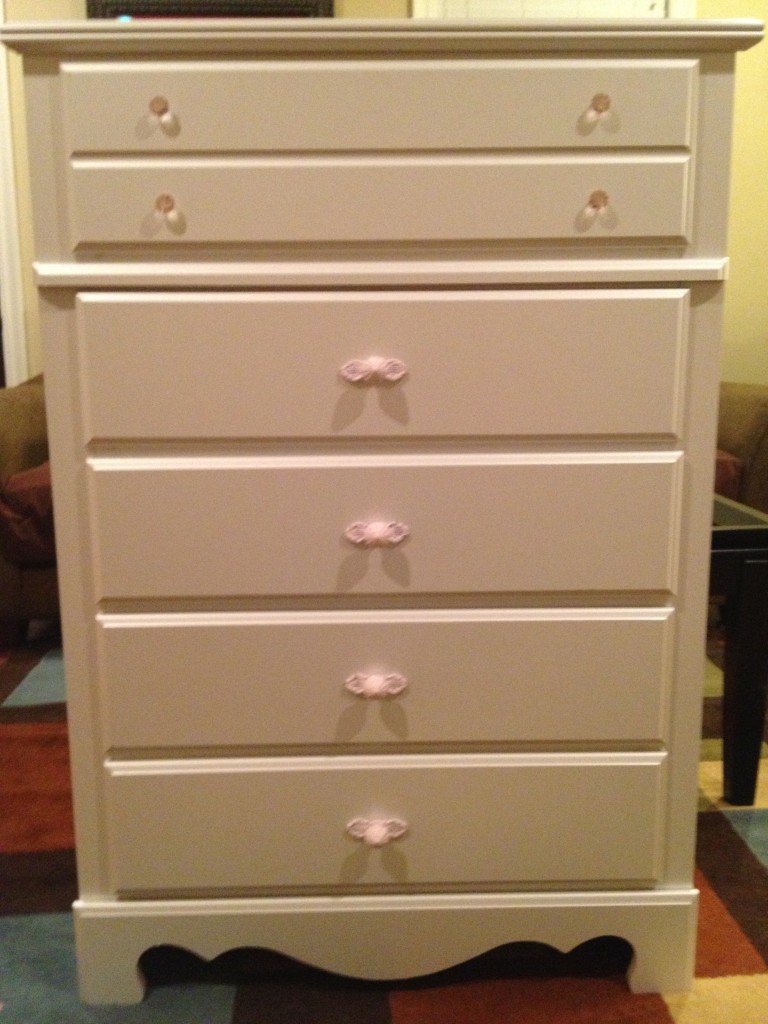
We found some gorgeous coordinating pink knobs and handles at Hobby Lobby (for ½ price!) and headed home to “make it work.” Figured out how I solved the problem yet? The handles we bought had 2 inch plates behind them, so I just drilled an additional hole in the drawers, and the plates covered the original, predrilled holes!

Break our your power tools!
Break our your power tools! The two outside holes were the original ones, & I drilled the one in the middle.
Dresser (5)
Isn’t she perfect for a little girl’s room?!

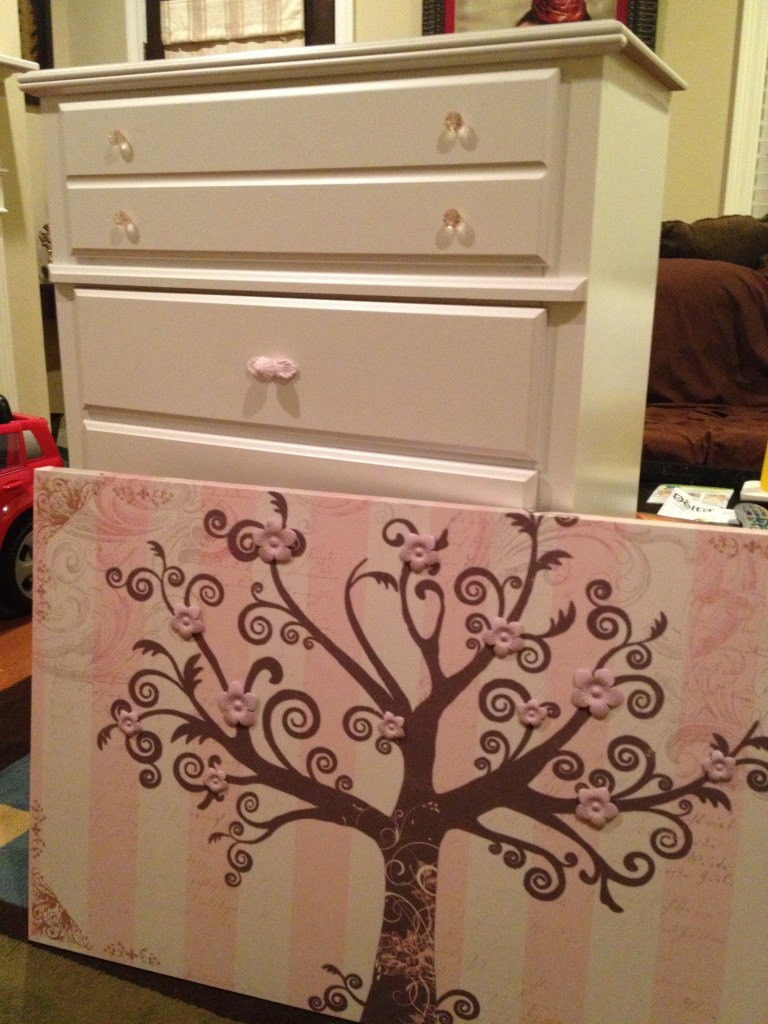
Our other steal for the day was this oh-so-pretty canvas print that ties together the purple & pink of the room perfectly. It was priced at $89.99 and on sale for ½ price. It gets even better! One of the wooden flowers on this particular canvas had fallen off, so we got an additional 10% off and just glued that puppy back on when we got home! All in all, we bought the dresser, hardware, canvas, laundry basket, and other wall art…all for the price of the original dresser!

They look great together!

What’s the moral of this story? Don’t be afraid to think outside the box. A little DIY project can save you lots of cash and turn out even more perfect in the end. I have another project for little Aubrey’s room up my sleeve, so I’m sure you’ll see more from her room soon!

P.S. I apologize that these photos are a little dark. We were doing these projects at 10pm with a sleeping little girl in the next room.

$1 Valentine’s Day Project

ValentinesTake a look at my quick, easy, and CHEAP Valentine’s Day décor. By cheap I mean it only cost me $1!

I picked up this garland heart at the Dollar Tree. When I got home I used some red tulle and cream ribbon to tie a bow on the top. Then, I tied a little loop of tulle through the back of the bow to use as a hanger.

I would have probably used a printed or white ribbon, but these were items that I already had. If you have to buy ribbon, this project would cost more than $1, but not more than $5!

I bought this for my front door, but it was a tad smaller than I’d like. It would be great for hanging on a cabinet door, wall, etc. Next year I’ll probably do something more creative with this heart, but with limited time right now, I’ll take this as a quick, easy, and completed project!

Finding pieces like these at the Dollar Tree and expanding upon them, is a great way to have inexpensive holiday décor. What do you think??

Bathroom Makeover

I’m finally getting around to posting pics of our bathroom makeover. With the busy holiday season approaching at Salt & Pepper, I’m sure my posts are going to be few and far between for a bit.

Before: Yuck!

Nonetheless, here it is…our amazing bathroom transformation! They say that bathrooms and kitchens sell houses. Well, that just wasn’t the case in our rent house. (I won’t even talk about the dreadful  kitchen today.) And as you can see, the bathroom is the size of a small closet. The awesome master bedroom, gorgeous hardwood floors, and PERFECT location are what sold us on this house…definitely NOT the bathroom or kitchen.

I will never understand what made someone chose this dreadful green color for the bathroom. It was the color of toothpaste! To make matters worse,

Love this shower curtain!

someone patched the walls (poorly) with the wrong color paint, which really made it look like a child smeared old toothpaste all over the place. In this case, a can of paint really made a huge difference.

Since the room is so small, I decided to paint it stark white. I also thought it would be a good contrast to this FABULOUS shower curtain.

We switched out all of the towel racks to our awesome, new branch-looking ones. (Thanks, Mom, for all of the new bathroom goodies. She hooked us up with a new bathroom as part of our wedding present.) We changed the knobs on the doors. Two doors had old, dreadful silver knobs, and the other two had porcelain white ones with monkeys on them…no joke. (Notice the new knobs match the shower curtain rings that I already had. Total accident, but I loved it!)

Possibly my favorite part of the new bathroom is this cool ladder shelf. I bought this ladder to use as a night stand, but it was too short. It makes a perfect holder for these baskets! Matt & I each have one for our toothbrushes, etc. (The baskets were also a wedding present.)

My favorite part!

Other bathroom details: My mom bought me the rug as a housewarming present when I moved here, and it covers up a large chunk of that ugly floor. The bird containers were also a wedding present from my mom. (I’ve since broken one of them, so now the center serves as a candle holder. I was so mad!) I already had the wall sconces, curtain hook, and rod from my very first town house. The curtain was originally my sisters. My mom used it for a bit at her house. Then, we used it as a table cloth at one of our wedding celebrations, and now it’s my bathroom curtain! Also, Matt hates the light fixtures, but I happen to love them! I think they compliment the decor nicely, and of course, I love anything vintage!

Well, there ya have it…our Sunday afternoon bathroom makeover. I’ll post the living room decor next, but in the meantime, let me know what you think of the bathroom! I love seeing everyone’s thoughts and comments!

After: Much Better!

The Five Year Plan

Where do you see yourself in five years?

Does that question send a chill down your spine like it does mine? Once upon a time, I was quite the planner. I had every aspect of my life planned and figured out. (If I could only tell you how many times I’ve had to start from scratch with a new plan!) After plans A-G fell through, I finally gave up.

Finally, one day I realized that’s not how life goes. You don’t get to plan everything. For example, owning a business or getting married in 12 days weren’t included in any version of my life plan! But, if I had stuck to these plans, I would have missed some of the most exciting times of my life.

In short, what I’m saying is, throw that rule book out the window. Every single day is different than the last. Every single day, you get a chance to do something different or be someone new. Don’t pass it up! The best thing I ever did was tell the life plan of mine to hit the road. Where will I be in 5 years? I have absolutely no idea. And I love that idea better than any scheduled version on my life.

Keep in mind that I don’t think anyone should float through life aimlessly with no goals. However, sometimes we focus so much on the “plan” that we miss other opportunities and adventures.

My advice: embrace unidentified tomorrows. Let each new day control your destiny. Don’t be afraid to be a new person. Adapt to your surroundings and make the most of every situation. After all, this life will be over before you know it. Make sure that you can look back on your yesterdays and be happy with what you see.

“Life should not be a journey to the grave with the intention of arriving safely in a pretty and well preserved body, but rather to skid in broadside in a cloud of smoke, thoroughly used up, totally worn out, and loudly proclaiming “Wow! What a Ride!” -Anonymous

I’d love to hear about your plans. Leave a post with your thoughts!

Move Over Paula Dean!

Looks yummy…not!
Ok, so I’m not quite Paula Dean. More like Chef Boyardee…that you heat straight from the can! Either way, here’s my post about my first major freezing experience, for those of you who are keeping up.

All of the blogs I researched said not to do your cooking/preparing/freezing on the same day that you shop. I’m sort of short on time, so I broke that rule. Big mistake! I didn’t realize the experience had taken so much out of me until I was straight in the middle of putting away my chicken (the last thing on the list). Luckily, Matt was a team player and came to save me, because I was about to throw it all in the trash and walk away! It went much quicker with an extra set of hands.

If you read my shopping post, you remember that I stocked up on hamburger meat that was dated for that day, so I knew I had to cook it quickly. (I’m a stickler for expiration dates, so I was paranoid about acting fast.) We were planning on having tacos that night, so I made 2 lbs into taco meat. We ate some that night and had enough for 2 additional meals to freeze. This worked great because each time we have tacos, we end up throwing away a good bit of meat.  This way, we had enough for a third meal! We haven’t tried the frozen taco meat yet, but I’ll report back on how it turns out.

After the tacos, I had 8 lbs of ground beef left, so I took to browning! I browned approximately 3 lbs at a time, drained it, and dumped it in a large storage container. After all the meat was browned, I left it to cool on the counter for a bit. (You shouldn’t put hot foods straight in to the freezer or fridge.) Once it was cool, I sorted the meat into one pound increments. I panicked at first because once the meat was all mixed together, I didn’t know how much a pound was. I don’t have a fancy meat scale. No worries though…I have a handy husband. He said a pound of hamburger meat was about 2 cups. (How does he even know all these random things??!) So, I measured out somewhere between 2-2 1/2 cups and poured into freezer bags. Before adding the meat, I wrote on all the bags and included the date so I would know how long it would be in the freezer. I’m a stickler for dates, remember?

All bagged and ready to go!

The most important thing about freezing in freezer bags is to remove every last bit of air that you can. This is what keeps foods from getting freezer burn and ruining.

The next day, I worked on all the other meats. I marinated a few steaks and put in bags of 2. I did the same with pork chops using this recipe. We haven’t tried them yet, but they smelled promising! Finally, it was time to do the chicken…dreadful chicken. As I mentioned before, most of our menu this month was chicken. Here’s a tip: don’t save your biggest task to last. Seriously, if Matt wouldn’t have come to help, I would have thrown the last of that stupid chicken in the yard and went to bed.

I had an assortment of breasts and tenderloins. I washed them all and piled onto a cutting board. I used my kitchen shears to trim them up so there would be less to do before cooking. (If you don’t have kitchen shears…get some!) After trimming all of the yucky stuff off (technical language), I moved them to a second cutting board where I sorted them by what was needed for each recipe. Even though most of the chicken was frozen plain, I still wrote the recipes on each bag. This will keep us from using chicken that was planned for another meal. It will also be easy to just pull out a bag for whichever recipe we want to make…less thinking involved.

Since this was my first experience, I didn’t do quite as much in advance as I could have. I realized when making this Parmesan Chicken, that I could have boiled the chicken before freezing it. Oh well, I’ll pay closer attention next time.

So far, it’s going well. The only major hiccup is that I’m not in the habit of taking the next day’s meal out the night before. Luckily, we have a pretty awesome defrost setting on our new microwave, so we can thaw things that way. But, I plan on getting better at doing it the night before.

All in all, it’s been successful. I can’t really tell a difference in the frozen meats vs fresh…especially if they thaw naturally. The biggest source of convenience is not having to go to the grocery store each week. I feel so relieved! Plus, we’re coming in under our food budget for this month. That’s a nice bonus! I’ll keep everyone updated about new findings and experiences regarding my stocked freezer. I promise my next post won’t be quite so long! There are just too many details for this topic!

I want to thank everyone for caring enough to read (especially these long ones). I’ve had fun sharing my experiences, and it’s so encouraging to have those of you who are wanting to keep up.

 
I hope to share our bathroom face lift next…it’s a good one!
 
Note:
If you’re interested in where I got most of my info, check out this site. This is where I decided I should try something like this. I literally read through every link on the page. Great info!
As always, I’d love to hear your thoughts!


Filling the Fridge

I made my first shopping trip for a month long supply of groceries, and it was a huge success!

We were spending an average of $115-150/week on groceries. (That’s $500+ a month.) Last week, I spent $219 for the entire month, giving us 29 meals! This doesn’t include small meals like sandwiches, etc. I am so proud of myself! (My saving came just in time because we got a $350 bill from the dentist. Ugh!) What’s even more exciting is that my goal was to spend under $400, and I was praying to not go over $600. When the clerk said $219, I almost jumped up and down!

Here’s how I did it:
I’ll start by saying I didn’t go coupon crazy or anything like that. I applaud people who can get groceries for next to nothing, but I simply don’t have that time or patience. I did load a few coupons to my Brookshires Loyalty Card for things I was already buying, but they only saved me a few dollars. (You should definitely get the app for your phone if you’re a Brookshires shopper.)

Preparing for the shopping trip took waaaay longer than I imagined. I went through 10 different cookbooks, searched online, and created a list of meals we’d like to have this month. This took quite a bit of time. It’s surprisingly hard to think about what you’d like to eat for the next 30 days!

I typed up all the recipes in a new “Petrus Family Recipes” file. (I’m still in shock that Matt & I are “The Petrus Family”…weird!) This seemed a little redundant, but I decided it would be best to have all of the recipes in one location, rather than having to dig around for them. This way, we can add and take away, creating a file of our favorites.

Then, I went through each recipe and made a list of all the ingredients I needed. I shopped our pantry to see what I already had, and made a list using tally marks for the rest. I stole this idea from a blog I read, and it worked great. (I’ll do better at remembering where I saw things and giving people proper credit…I’m new to this blogging thing.) Basically, you just write down the things you need and put tally marks next to them as you come across more of that item in another recipe. Genius! I ended up rewriting my list to be sure it was nice and neat. I also put it in order of departments, which made it much easier when I was at the store.

Next, I looked at the Brookshires sale paper. (Probably should have done this first.) I love Brookshires because it’s always nice, clean, and fully stocked. I don’t have time to shop around, so we’ll be saving on whatever they’re putting on sale. (I just won’t drive across town to save .50 on flour.) This week was a great week for my first big trip…so much great stuff was on sale! I adjusted my menu a tad to include some sale items and headed out! All in all, I probably spent 8 hours preparing…maybe a little more. I expect it to go faster as I get more experience.

The big sales at Brookshires really played in to my huge savings. Chicken was buy one, get one for a penny. Most of my menu was new chicken dishes, so this worked perfectly! There were several other things I needed that were on this promotion too, so we lucked out!

I’m also so very proud of my ground beef purchase, so much so that I have to blog about it! I needed 10 pounds of ground beef, and the bulk packages weren’t really that good of a deal. As I’m picking out my chicken, the meat market lady puts out some big packages of hamburger meat that caught my eye. They had been marked to half price for quick sale because they went out of date that day. This was perfect because I was planning to brown and freeze all the hamburger meat when I got home anyway! I ended up paying $20 for ground beef that I was going to have to pay $40 for. As silly as it sounds, I couldn’t wait for Matt to get off work so I could tell him about my steal. Between this and the buy one, get one for a penny sales, we really saved some money this month!

All in all, I’m pretty proud of my shopping trip. Doing my homework and preparing ahead of time, really made a huge difference. So far, I’ve only noticed a few small things that I forgot. Not too bad for my first time! I’m really hoping that having a month worth of groceries in the house and a clear plan will save us some valuable time and money. Guess we will see!

For those interested, I’ll post about my cooking/freezing adventure very soon. There’s lot going on in the Petrus household!

Please let me know your thoughts. I’d love to hear them!

Why did I get married??

Let me start by saying that I don’t want to be one of those people who over-post about how wonderful their spouse, baby, etc. are. So, if you’re one those people who might want to gag at my bragging (like I probably would), you might want to turn away now.

However, as I’m unwinding in my comfy bed, eating a brownie my husband just baked and brought to me, I realized there might be some solidity to my thoughts. I realized that someone might could benefit from hearing about my day. What started as a simple Facebook update, has turned in to a story about waiting for the “right” person.

A lot of pressure is put on girls, starting at a very young age, to find Prince Charming & get married. I went to college, worked a good job, and started my own business all before I was 23, but none of that amounted to anything because I wasn’t married yet. (Please be cautious with your comments so as to not to make a young girl feel slighted because she hasn’t tied the knot yet.) I came close to marrying the wrong person a couple of different times. Now, I thank my lucky stars that something inside of me stopped me each time.

How do you know who is “right” for you? Here’s how I know. Today, I had a particularly crummy afternoon. I got so bogged down by things going on around me, and I really let it get me down and discouraged. My new husband knew I wasn’t having the best day. I came home to dinner cooked and ready with the table set, awaiting my arrival. This in itself was a treat, because I probably would have broken down in the kitchen if I couldn’t find the right spatula. Then, he spent our entire dinner listening to me rant and rave about every tiny, minuscule thing that bothered me today. Next, we went for a walk around the neighborhood (my request), while I ranted some more. He listened, which was the most important thing I needed, but also provided such beneficial suggestions/comments. (He always says the best things.) How do I know I picked the right mate? Because my husband reassures me and builds me up when I’m down. Now, I’m chillin’ in my cozy bed, enjoying a brownie and milk that he cooked, recuperating from my trying day. (Reason number 7,462 I married him – he cooks!)

Moral of the story: it is so very important to pick someone who is a good balance for you. Life isn’t a fairy tale made up of exotic vacations and leisure activities. Life is days like today, where you come home exhausted, beaten down, and ready to give up on everything. That’s what the real world is. So, you need to pick someone who makes those days worthwhile. When picking someone you’re supposed to spend forever with, you need to pick someone who picks you up when your down. Someone who balances out your negatives. Someone who listens and helps you make tough decisions. Someone who fixes dinner and/or brownies when you just don’t have the strength. It’s like a seesaw…when you’re down, they bring you back up. When they’re down, you bring them back up. The roller coaster ride of life doesn’t end until you close your eyes for the last time. You have to pick someone based upon how you are as a couple during those times.

That being said, if you’re not dating someone who does this very thing for you. Get rid of them! Starting over isn’t nearly as scary if you think about eventually finding someone who can be the partner you really need.

I’m not writing this just to brag on my husband (although he deserves it). I’m writing this in hopes that someone may read it and realize they could do better. I’ve struggled many times over the years, not getting what I needed from a relationship. (And guilting myself for needing “too much.”) But that’s not the case. Girls, if you don’t have a guy that can turn a bad day around within seconds, then you don’t have the right guy. Just keep waiting. Do not settle for anything less than a man who takes your bad days away.

This post turned out to be quite a bit longer than I hoped, but I felt burdened to share my thoughts. This life is tough. Every day brings a new struggle. The purpose of marriage and relationships is to find someone who makes things more bearable. I am so very blessed to found such a good man. I thank God for him every single day. If you’re not quite there yet, don’t worry! Your time is coming. And one day you will sit back and be thankful for not settling for anything less than wonderful.

Post Marriage Plans

I’m going on a month and a half now of being married to the most wonderful man on the planet. I didn’t really expect much to change after getting married, but surprisingly things have. I’ve found myself becoming much more Suzy Homemaker-ish! Many of you don’t know this yet, but my new husband is going back to school. While taking care of his dad after the plane crash in the spring, he decided the he might really like that medical stuff. So now we, (I say we because it’s going to take the both of us!), are off to try out a nursing degree.

So what does this mean for our new little family? Two things. 1. We will be taking an income reduction because my sweet husband won’t be able to work as much. 2. Our costs are going to rise as he will be commuting 40 miles/day to school and we have to pay for his schooling this time around. (Too bad TOPS doesn’t give you a chance for a second degree!)

Long story short, I’ve been consumed with things that I can do to cut costs around the house without changing our lifestyle too much. I’ve seriously spent hours and hours on Pinterest looking at cool ideas. It’s like my new mission to make things more efficient around here!

So here’s what I have so far:
1. Canceling cable. I’ve seriously watched it maybe 3 times the last 6 months. What a waste! Plus, we have Netflix and Hulu+ to keep us entertained. (I just gotta figure out how to get Salt & Pepper’s big tv debut off the DVR first.)

2. Making my own laundry detergent. My BFF did this over the summer and she loved it. I found a pretty simple recipe for liquid detergent and it claims to cost just $6 for over 500 loads. Sign me up!!

3. Making my own cleaning supplies. I’ll be honest. I always thought this was so lame. However, it is proven that the chemicals in cleaner you buy are bad for you. Did you know that those companies have NO regulations on what they can put in their cleaners? Crazy! Plus, some of the cleaner recipes I’ve found, swear that they clean better than traditional cleaners. I’m certainly willing to try anything that means less scrubbing!

4. Now here’s the real shocker. I’m about to try freezer cooking. It’s gonna be tough for anyone who really knows me to not fall over dead after seeing this but, I’m just so intrigued by it! Basically, you make one big shopping trip a month, prepare a month worth of meals at once, and freeze them! The big plus with this idea is that we’re approaching the hubby and I’s busy seasons at work. Plus, he has schoolwork now, too. Having time/energy to cook an elaborate meal just isn’t going to happen. So I’m going to give this little notion a try. In addition to saving time & energy, you also save money by making just one trip to the store (less impulse buys) and by buying things in bulk.

All of these things are very unlike me. I can’t decide if I’m just intrigued by the simple living styles, or if this marriage thing has gone to my head. I’ve always been a pretty thrifty gal, but sure as heck never considered making my own soap! Either way, I’m gonna tackle a few of these ideas soon & I’ll let the 3 of you who read this first-ever-blog-post of mine know how it goes.

(In addition to these, I have a million other DIY projects up my sleeve, so I’m going to use this blog to keep track of my progress. Follow along if you’d like!)

Pamela P.

© 2015 Theme by NUDGE MEDIA DESIGN.